For Admin Role
The Roles and Permissions section allows the Organization Administrators to create different roles other than the default ones that are created by the system. In addition, the administrators can control the permissions that are granted to the newly created roles according to the work need.
To create A new Role:
- On the left navigation panel, click
 and then Click
  . The system displays the Roles and Permissions page, as in the following figure:
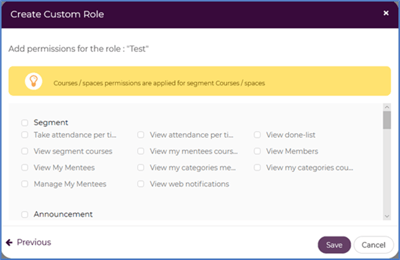
- On the Roles and Permissions page, click Create Custom Role. The system displays the Create Custom Role dialog box, as in the following figure.

- Type the new role’s name and description in the Role Name and Role Description boxes respectively.
- From the Role Category drop-down list, select the category of the role you want to add, which will determine the kind of permissions this role can have, as follows:

- To create a role that takes the permissions of instructors, select Instructors.
- To create a role that takes the permissions of trainees, select Employees.
- To create a role that takes the permissions of administrators and academic coordinators, select Admins.
- From the Role Level drop-down list, select the level upon which the new custom role can use the system’s features.
- You can choose to copy the permissions of a default system role to the new custom role you are creating, as follows:
- To copy the permissions of an instructor role, select Instructors from the Role Category drop-down list, and then select the related role from the Copy permissions from the drop-down list.
- To copy the permissions of a trainee role, select Employees from the Role Category drop-down list, and then select the related role from the Copy permissions from the drop-down list.
- To copy the permissions of an administrator or an academic coordinator role, select Administration from the Role Category drop-down list, and then select the related role from the Copy permissions from the drop-down list.
- Click Next to move to the Permissions for the Role page, where you can select the permissions you want to grant to the custom role you are creating.